Introduction
Video: LabVIEW in Automation - DAQ in LabVIEW + PowerPoint (PDF)
Prerequisites: Basic LabVIEW Programming
- Step 1 (Preparations): Go through videos, resources, examples, and step by step exercises you find below in your own pace.
- Step 2 (Delivery Assignment): Solve the Delivery Assignment as described in the bottom of this web page. Here you need to use the skills learned in Step 1.
Hardware
We need the following Hardware in this module:
- USB-6008 is a multifunction I/O Device from National Instruments. Similar DAQ devices can also be used as long as they are compatible with the DAQmx driver from National Instruments (see below).
- TMP36 Temperature Sensors (SparkFun) (can also be found at Elfa and Adafruit)
- Thermistor 10K Temperature Sensor (SparkFun) (can also be found at Elfa)
- Breadboard (avalible from Kjell & Company, Sparkfun, Elfa)
- LED - Red (Elfa)
- LED - Green (Elfa)
- Resistor 220/270 Ohm x 2 (Elfa)
- Resistor 10 kOhm (Elfa)
- Jumper Wires (to the Breadboard) (Elfa)
Other handy hardware: Screwdriver 2.5mm, Battery (1.5V or 9V), Multimeter
These components are very easy to use and cost almost "nothing". If you have an Arduino Kit, a temperature sensor is typically included.
You will also find lots of Temperature Sensors at Kjell & Company.
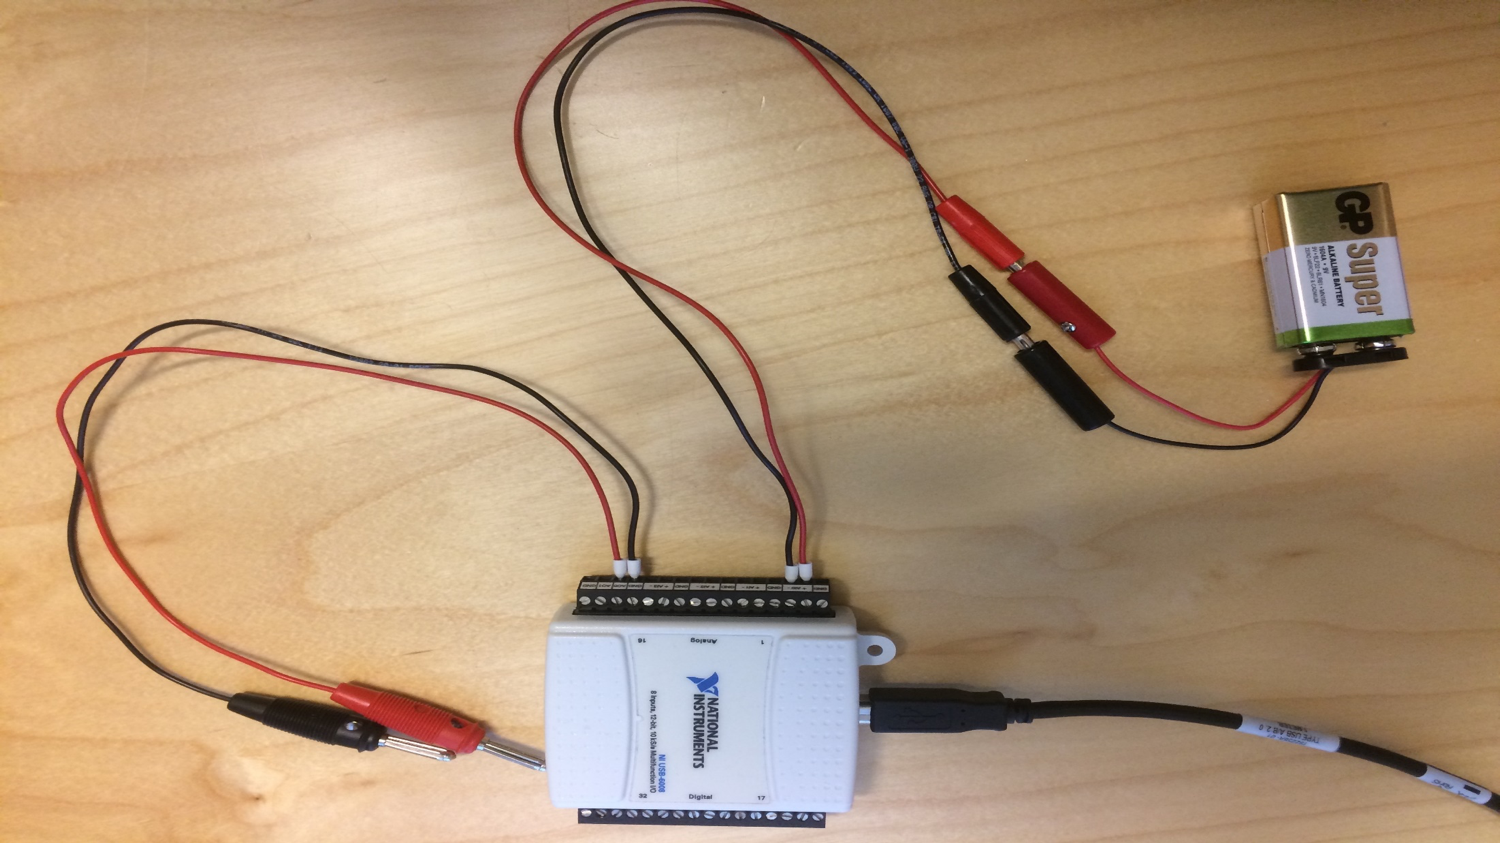
Note! If you don't have one or more of the temperature sensor listed, you can use another sensor, or even a battery as illustated below.
Software
NI-DAQmx - Driver for Hardware from National Instruments, like TC-01 Thermocouple, USB-6001 or USB-6008, etc.
Here you find more information about NI-DAQmx.
DAQ in LabVIEW
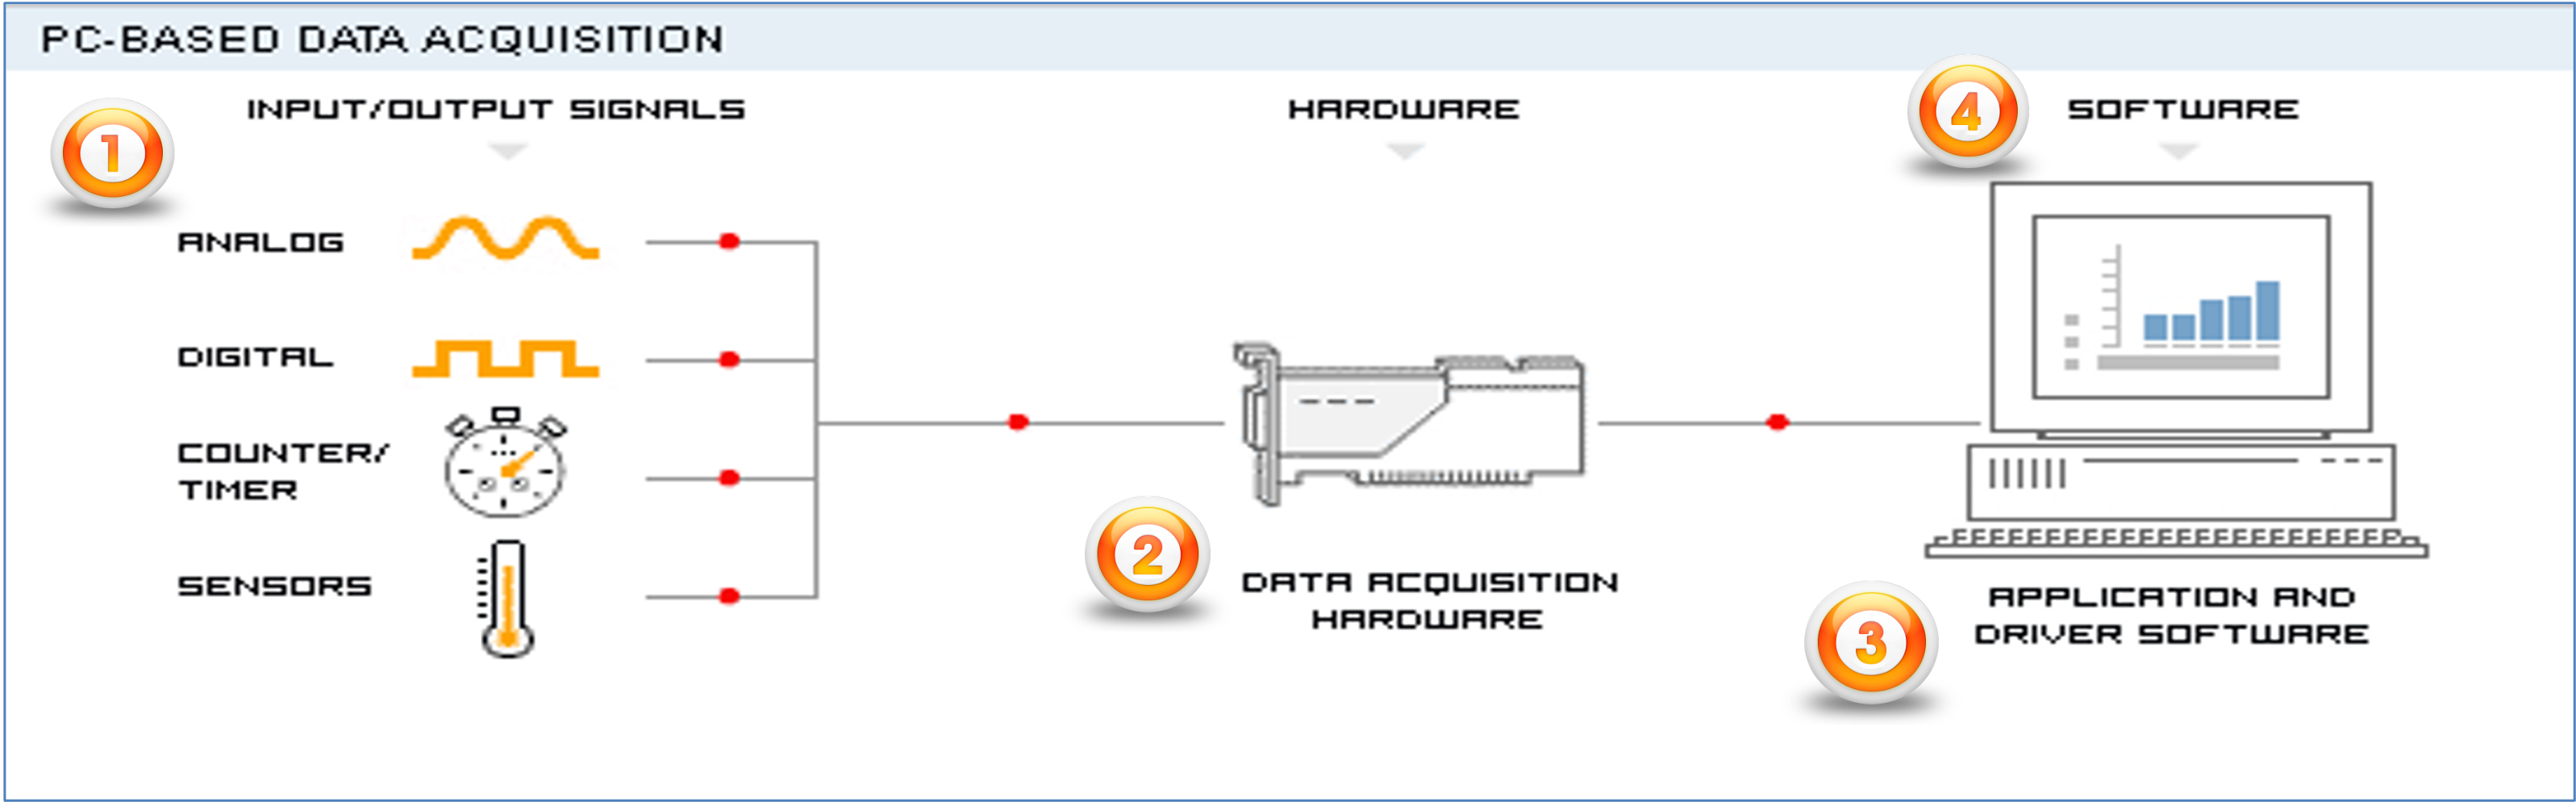
A DAQ System consists of 4 parts: (1) Physical input/output signals, (2) sensors DAQ device/hardware, (3) Driver software and (4) Your software application (LabVIEW). LabVIEW is well suited for creating DAQ applications and many hardware devices are supported.
The video below introduces the term Data Acquisition (DAQ) and how to use it in LabVIEW:
Introduction to DAQ in LabVIEW (Video)
Note! The video uses a TC-01 as an example. You dont need this device. We will use a USB-6008 DAQ device/I/O module.
PowerPoint used in the Video (Tutorial)
USB-6008 in LabVIEW
USB-6008 is a multifunction I/O Device from National Instruments.
The National Instruments USB-6008 is a low-cost, multifunction data acquisition device (DAQ). It has 8 analog inputs, 2 analog outputs, and 12 digital input/outputs. The digital channels are divided into two ports. When one or more channels on each port is set to either input or output, the port is locked into that particular mode.
Make sure to read the User Guide and Specifications for USB-6008 and USB-6008 Pinout.
The USB-6008 uses the NI-DAQmx driver software and is compatible with LabVIEW (but also C#, MATLAB, etc).
You should watch the Videos/Tutorials below for each topic. Make sure to actually do the examples by yourself in LabVIEW.
In the video below you learn how to use the USB-6008 in LabVIEW:
USB-6008 in LabVIEW (Video)
PowerPoint used in the Video (Tutorial)
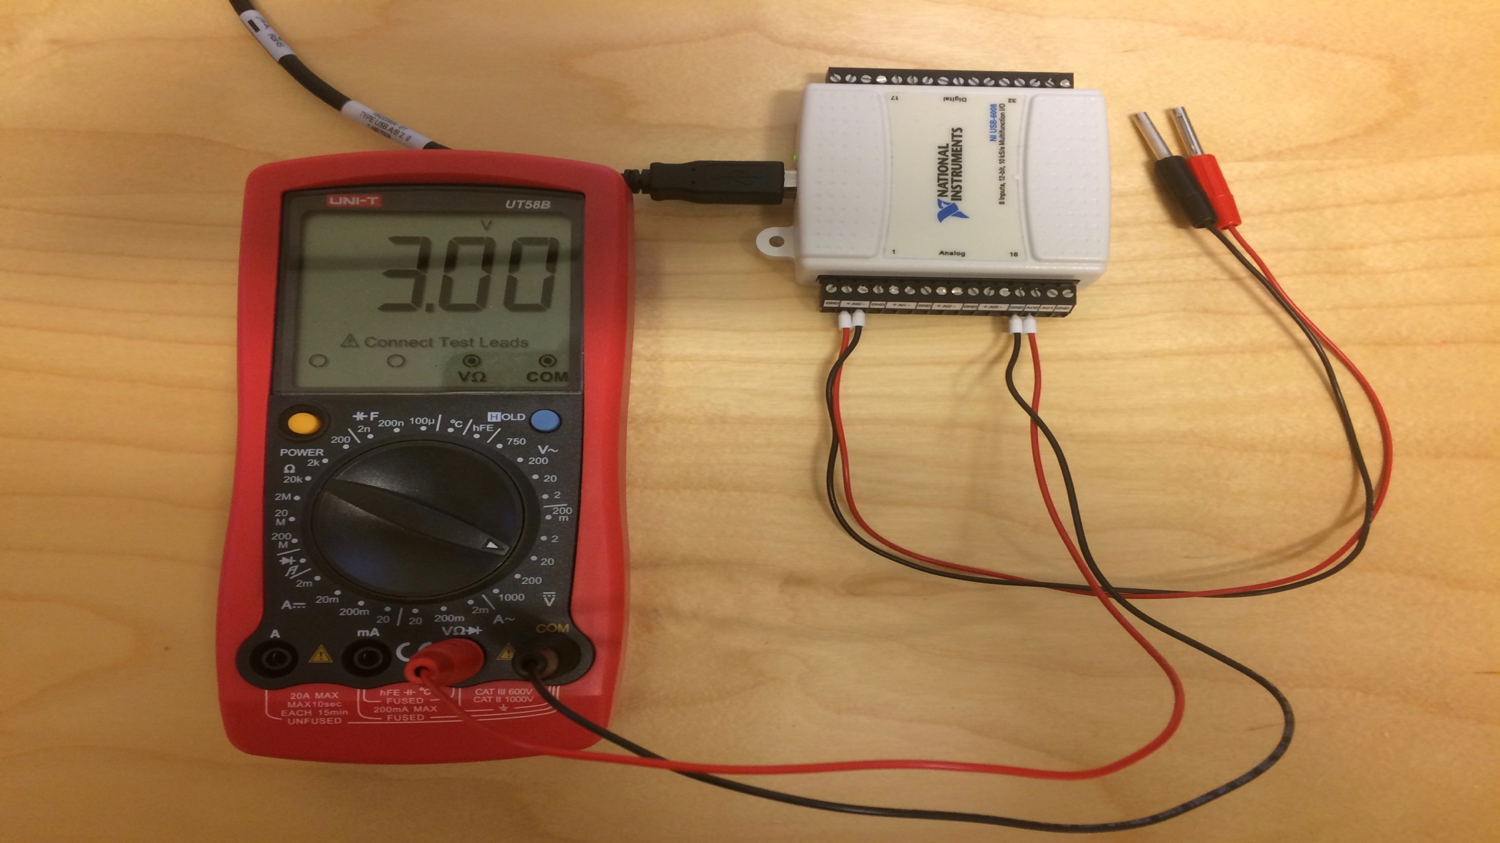
Multimeter
When testing Analog Out (or Digital Out) you can e.g., connect the USB-6008 to a multimeter to test if the signal is as expected.
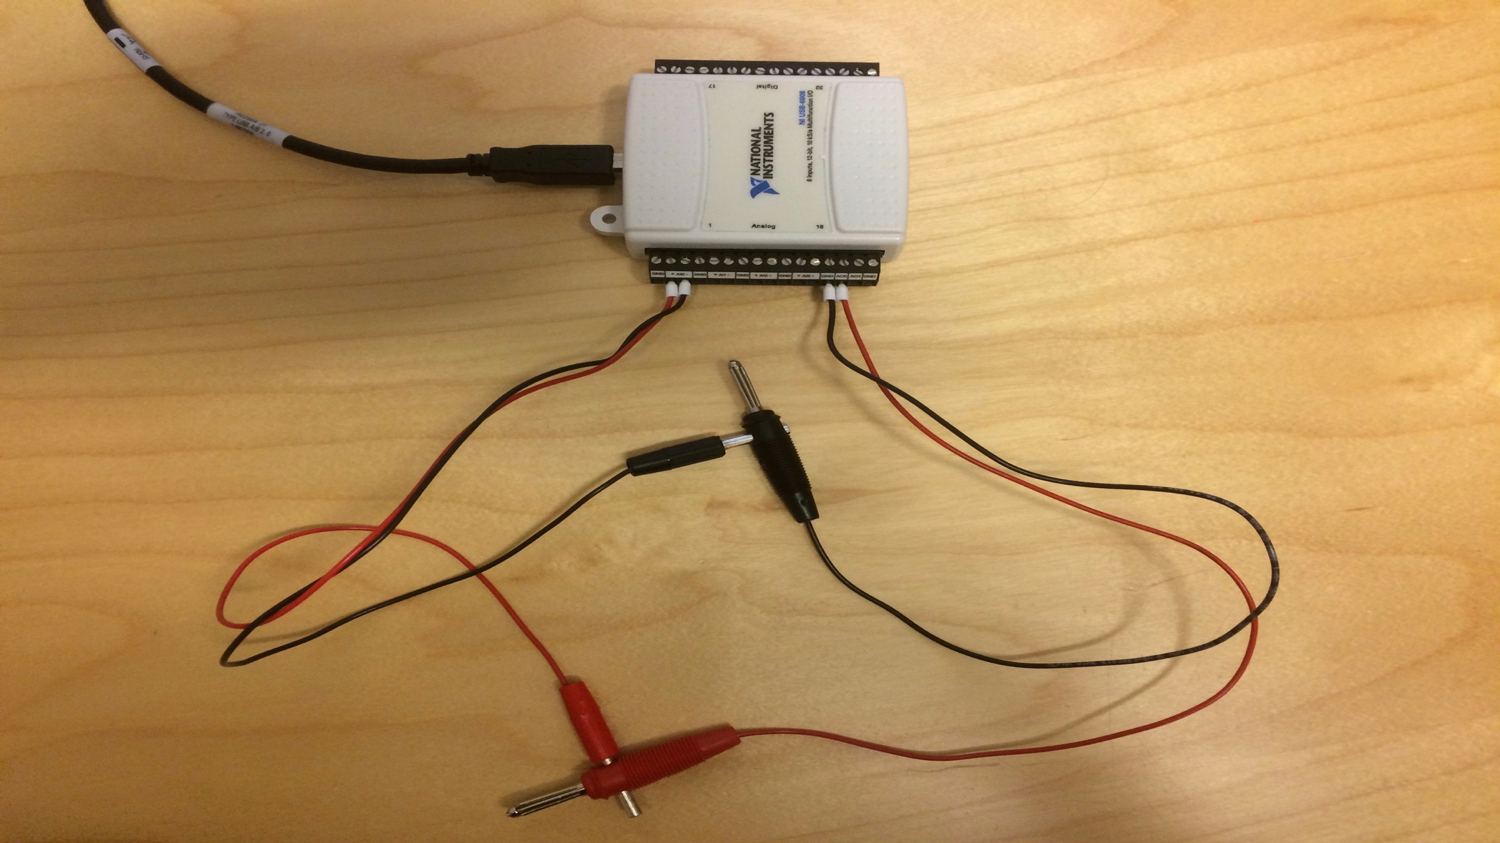
Loop-back Test
When testing Analog In/Out Pins (or Digital In/Out) you can also use a so-called "Loop-back" Test. here you just wire the input and out put together as illustrated.
DAQ Tutorials
You should go through the following resources:
Temperature Sensors
TMP36 Temperature Sensor Overview
Thermistor Temperature Sensor Overview
Temperature Sensors Tutorial + LabVIEW Code
TMP36 Temperature Sensor in LabVIEW (Video) + PowerPoint (PDF)
Thermistor Temperature Sensor in LabVIEW (Video) + PowerPoint (PDF)
Using LEDs
What is a Resistor? + Resistor Calculator
LED Examples Tutorial + LabVIEW Code
LED in LabVIEW (Video) + PowerPoint (PDF)
Low-pass Filter
Implementing Low-pass Filter in LabVIEW (Tutorial)
Low-pass Filter in LabVIEW (Video) + PowerPoint (PDF)
Logging to Text Files
When acquiring data from a DAQ device or an I/O Module you typically want to store the data to either a File, a Database or an OPC Server Here we will use the “Write To Measurement File” in LabVIEW as an example If you don’t have a DAQ device or an I/O Module you can create a simple Simulator as exemplified later in this Tutorial.
Logging to Text Files in LabVIEW (Tutorial)
Logging Temperature Data to Text File in LabVIEW (Video) + PowerPoint (PDF)
Fritzing
Fritzing is an open source software for design of electronics hardware and creating circuit diagrams Documentation is important! Creating professional circuit diagrams is important, so you should consider using a tool like Fritzing for designing and documentation of your circuit diagrams.
Download from http://fritzing.org
LabVIEW Programming Guidelines
Typically engineers often create simple LabVIEW VIs that eventually grow out of control, because they don't have the proper structure and best practices. The solution to this problem is organizing your code and data in a way that enables modularity, readability, and reuse.
Some examples are:
- Intuitive GUI (Front Panels): Add Units, Use Controls and Indicators from the same Palette, Resizing the Window size, Don’t use “strong” Colors, etc.
- Structured Code (Block Diagram): Make and use SubVIs, Avoid Spaghetti Code, Resizing the Window size, Use Labels, Always use Project Explorer, use State Machine, etc.
For more details, see the video below.
Video: LabVIEW Programming Guidelines
LabVIEW Programming using State Machine